
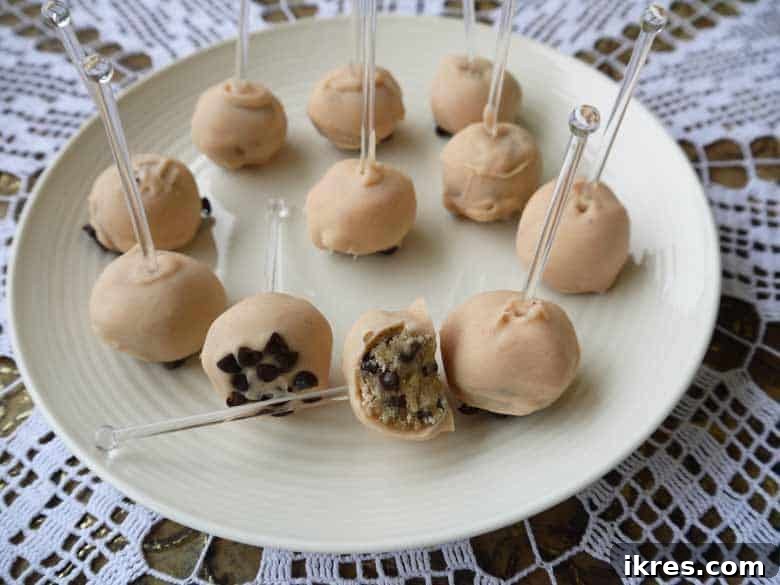
Delightful White Chocolate Covered Cookie Dough Bites: The Ultimate No-Bake Treat
There’s something truly magical about celebrating life’s precious moments, especially when it involves welcoming new arrivals. When my dear friend announced she was expecting twin girls, the excitement was palpable! Naturally, throwing a memorable baby shower was at the top of our list. As I envisioned the perfect dessert spread, one idea kept swirling in my mind: elegant, pink, white chocolate covered cookie dough balls. It was a vision I couldn’t shake, a dessert that promised both whimsy and pure indulgence.
Making them, however, felt like stepping into uncharted culinary territory. I’d never attempted anything quite like it before, leading me to stock up on an amusing array of supplies – multiple brands of white chocolate, various picks, and a generous supply of chocolate chips. The journey, as many baking adventures are, was a testament to trial and error. Melting white chocolate proved to be a formidable challenge, leading to a few discarded batches and some valuable lessons learned. But the effort was undeniably worth it. The final result? Absolutely delicious! Imagine, if you will, the rich, comforting taste of edible cookie dough, enrobed in a smooth, sweet shell of white chocolate. Who could resist?
The proof was in the pudding, or rather, in the rave reviews. At the shower, a friend enthusiastically approached me, declaring that the cookie dough bites were so incredibly good she wanted to “steal them all.” A quiet smile played on my lips as she confessed her newfound obsession, unaware that I was the mastermind behind her favorite new treat. That moment of genuine delight cemented my decision: this recipe was too good not to share. So, get ready to dive into the art of crafting these exquisite White Chocolate Covered Cookie Dough Bites, a no-bake wonder that’s sure to impress at any gathering.
The Edible Cookie Dough Foundation: A Recipe for Perfection
The heart of these delectable bites lies in the cookie dough itself. For this recipe, I turned to a beloved, time-tested gem from my cookbook, affectionately titled “Forget The Cookies, Just Give Me The Batter.” This recipe, which I believe originated from an old children’s cookbook, has always been a winner. While the baked cookies might not be extraordinary, the raw cookie dough is absolutely divine. To transform this classic into safe-to-eat edible cookie dough, the crucial step is to omit the eggs and baking soda. The eggs are removed for food safety reasons, as raw eggs can carry risks, and the baking soda is unnecessary since we won’t be baking the dough.
Ingredients for the Perfect Edible Cookie Dough
Creating the ideal texture for our cookie dough bites requires attention to detail. One vital tip is to ensure that both the brown and white sugars are completely dissolved and melted into the butter. This step is critical; if the sugar crystals aren’t fully integrated, your finished cookie dough balls might have an undesirable grainy texture instead of the smooth, melt-in-your-mouth consistency we’re aiming for. Take your time during this initial mixing phase to guarantee a velvety smooth dough.
Once your dough is thoroughly mixed and boasts that perfectly smooth consistency, it’s time for its first chill. Transfer the dough to the refrigerator for at least thirty minutes. This chilling period is essential for several reasons: it allows the flavors to meld, firms up the dough, and makes it much easier to handle and roll into uniform balls. Don’t skip this step!
Crafting the Cookie Dough Balls
After the initial chilling, remove the dough from the fridge. Now comes the fun part: shaping our bites! Using a tablespoon as a guide, scoop out even portions of the cookie dough. Roll each portion between your palms to form perfectly round, uniform balls. Consistency in size not only makes for an attractive presentation but also ensures even coating when we dip them in chocolate. Place these newly formed cookie dough balls onto a plate or a baking sheet lined with parchment paper.
To prepare for dipping, gently insert a regular toothpick into the center of each cookie dough ball. This toothpick will serve as a handle during the dipping process. Once all your balls are skewered, return the plate to the refrigerator for another thirty minutes. This second chill is crucial for firming up the dough around the toothpicks, making them sturdy enough to withstand the warm chocolate bath without falling apart.
Mastering the White Chocolate Coating: A Delicate Art
While your cookie dough balls are chilling to perfection, it’s time to tackle the most challenging, yet rewarding, part of this recipe: melting the white chocolate. I can attest from personal experience that melting white chocolate is a delicate art, far more challenging than its dark chocolate counterpart. White chocolate has a lower melting point and a different composition, making it much more susceptible to burning or seizing. By “burning,” I mean it can quickly transform from smooth, luscious drops into a grainy, hardened, clumpy mess that is utterly unsalvageable for dipping. My early attempts resulted in two wasted bags of white chocolate – a truly frustrating experience!
The Secret to Smooth White Chocolate
Through perseverance (and a bit of desperation!), I finally uncovered the foolproof method for melting white chocolate: the double boiler technique, with a critical modification. Instead of placing the chocolate over vigorously boiling water, which is often recommended for dark chocolate, white chocolate requires a gentler approach.
- **Preparation:** Place your white chocolate (chips or finely chopped bars), one tablespoon of butter, and a few drops of red food dye (if you’re going for that lovely pink hue) into a thick, heat-proof plastic or glass bowl.
- **The Water Bath:** Set this bowl over a pot of water, ensuring the bottom of the bowl does not touch the water. Crucially, the stove should be on **medium heat**, and the water should **not be boiling**. We’re looking for a gentle simmer, not a rolling boil. Excessive heat or steam coming directly into contact with white chocolate can cause it to seize.
- **Gentle Melting:** Stir the chocolate frequently, removing it from the heat source every few minutes to stir thoroughly before returning it. This intermittent stirring and removal from direct heat prevent overheating and ensure a smooth, even melt. Continue this process until the chocolate is completely smooth, glossy, and beautifully pink (or white, if you prefer).
Once your white chocolate is perfectly melted and infused with that delicate pink shade, remove the bowl from the heat and set it aside to cool slightly to room temperature. This is important: dipping chilled cookie dough into very hot chocolate can cause the chocolate to crack or create a thick, uneven coating. A slightly cooled, yet still fluid, chocolate will give you the best results.
Assembling Your Masterpiece: Dipping and Finishing Touches
Now it’s time to bring everything together! Retrieve your firm, chilled cookie dough balls from the refrigerator. One by one, dip them into the prepared white chocolate. Here, a lesson I learned the hard way comes into play: regular toothpicks are simply not sturdy enough. They tend to bend or snap under the weight of the dough, often sending your precious creation tumbling into the chocolate abyss. Luckily, I had purchased larger, clearer picks (as you can see in the photos), which proved to be perfectly robust for the task.
Dip each cookie dough ball, ensuring it’s completely coated. Then, carefully spin the ball sideways over the bowl to allow any excess chocolate to drip back into the bowl. For a cleaner finish, you can also use a spare toothpick to gently wipe away any lingering drips from the bottom. If, by chance, a pick feels loose or falls out, simply dip it back into the melted white chocolate, reinsert it into the hole, and let it harden in place on your wax paper. This helps secure the pick and ensures a smooth base.
The Genius Chocolate Chip Base
While the white chocolate coating is still wet, this is where another hard-learned lesson comes into play: immediately dunk the bottom of each chocolate-covered cookie dough ball into a small bowl of mini dark chocolate chips. This serves a dual purpose: it adds a delightful textural contrast and, more importantly, prevents the finished bites from sticking to the wax paper or serving plate as they set. Without this chocolate chip base, I found they would often adhere, making them difficult to remove cleanly. With the chips, they dry out perfectly, lifting easily and looking beautifully presented. This entire process, while a bit messy, is incredibly satisfying and absolutely worth every sticky finger!
Storage, Serving, and Sweet Inspirations
Once all your delectable White Chocolate Covered Cookie Dough Bites are coated and adorned with their chocolate chip bases, allow them to fully set at room temperature for a bit, then transfer them to the refrigerator. They can be stored in an airtight container in the fridge until you’re ready to serve. I often make them the day before an event, which saves time and ensures they are perfectly chilled and firm when guests arrive. Bring them out about 15-20 minutes before serving for optimal texture, allowing the cookie dough to soften just slightly while the chocolate shell remains crisp.
These edible cookie dough bites are not only a fantastic dessert for baby showers, but they are also perfect for birthday parties, holiday gatherings, or simply as a special treat for yourself. You can customize them for any occasion by changing the food coloring, adding sprinkles instead of chocolate chips, or even experimenting with different flavor extracts in the cookie dough. Imagine vanilla bean dough with a raspberry-infused white chocolate coating, or a classic chocolate chip dough with a mint green shell for the holidays!
On a final note, if you’re as excited about twins as I am, you absolutely must check out my friend’s fantastic blog, TwinGemsBlog. It’s a wonderful resource for all things twin-related! And if you share my love for white chocolate, you might also enjoy my recipe for White Chocolate Chip Cookies – another sweet indulgence to satisfy your cravings.
White Chocolate Covered Cookie Dough Bites
Share by Email
Print Recipe
Edible cookie dough bites coated in white chocolate make an easy sweet treat everyone will love.
Ingredients
- 1/2 cup melted butter
- 1/2 cup brown sugar
- 1/2 cup white sugar
- 2 tsp vanilla extract
- 1/2 cup + 6 tbs all-purpose flour
- 1/4 tsp salt
- 3/4 cup mini dark chocolate chips
- 2 tbs milk
- 11 ounces white chocolate, good quality
- a few drops red food dye (optional, for pink color)
- 1 Tbs butter (for melting chocolate)
Instructions
- In a small saucepan, gently melt the 1/2 cup of butter over low heat.
- Add both brown sugar and white sugar to the melted butter in the pan. Stir continuously until both sugars are completely dissolved and the mixture is smooth. Remove from heat and stir in the vanilla extract.
- In a separate medium-sized bowl, whisk together the flour and salt until well combined.
- Pour the warm butter and sugar mixture into the flour and salt mixture. Mix well with a spoon or spatula until a cohesive cookie dough forms.
- Fold in the 3/4 cup of mini dark chocolate chips and stir until evenly distributed throughout the dough.
- Transfer the cookie dough to the refrigerator and chill for at least 30 minutes. This helps the dough firm up and become easier to handle.
- After chilling, scoop out tablespoon-sized portions of the dough. Roll each portion into smooth, round balls with your hands and place them on a plate or baking sheet lined with parchment paper. Insert a regular toothpick into the center of each ball, then return them to the fridge for another 30 minutes to ensure they are very firm.
- While the cookie dough balls are chilling, prepare the white chocolate coating. In a thick, heat-proof plastic or glass bowl, combine the 11 ounces of white chocolate, 1 tablespoon of butter, and a few drops of red food dye (if desired for pink color). Place this bowl over a pot of water set over medium heat, ensuring the bottom of the bowl does not touch the water. The water in the pot should be gently simmering, not boiling.
- Stir the white chocolate mixture frequently, lifting the bowl off the heat periodically to stir, until the chocolate is completely melted and smooth. Remove the bowl from the heat and set aside to cool slightly to room temperature while remaining liquid.
- Remove the hardened cookie dough balls from the fridge. Using sturdy picks (larger clear ones work best, as regular toothpicks may not hold), dip each cookie dough ball one at a time into the melted white chocolate, ensuring it’s fully coated. Gently turn the ball sideways over the bowl to allow excess chocolate to drip off. You can use a clean toothpick to help wipe off any additional drips from the bottom.
- While the chocolate coating is still wet, immediately dunk the bottom of each chocolate-covered cookie dough ball into a small amount of mini chocolate chips. This prevents sticking and adds a lovely finish. Place the finished cookie dough bites onto wax paper or parchment paper to set.
- Once all the cookie dough balls are coated and have their chocolate chip bases, let them set completely. You can store them in an airtight container in the fridge until you are ready to serve them.
Nutrition
Calories: 383 kcal
Carbohydrates: 47 g
Protein: 4 g
Fat: 21 g
Saturated Fat: 14 g
Polyunsaturated Fat: 1 g
Monounsaturated Fat: 5 g
Trans Fat: 0.3 g
Cholesterol: 29 mg
Sodium: 156 mg
Potassium: 176 mg
Fiber: 1 g
Sugar: 37 g
Vitamin A: 278 IU
Vitamin C: 0.2 mg
Calcium: 101 mg
Iron: 1 mg
Nutrition information is automatically calculated, so should only be used as an approximation.
Additional Info
Tried this recipe? Mention @perchancetocook or tag #perchancetocook!